Hosting your own website opens up a world of possibilities, giving you control over how your site functions and scales. It’s not just about creating a space online – it’s about owning it. Whether you’re launching a business website, a personal blog, an online store, or a resource hub, hosting decisions shape your site’s speed, security, and accessibility.
Many believe hosting is overly complex or expensive, but the reality offers a range of options tailored to different levels of technical expertise and budgets. From beginner-friendly web hosting providers to fully self-managed servers at home, there’s a solution for everyone.
This article breaks down the key hosting options, costs, tools, and steps, so you can make an informed decision. By the end, you’ll have a clear understanding of how to host a website – whether you choose a hosting provider or set up your own server at home.
What Are Your Hosting Option?
When hosting your own website, you have several paths to consider. Each option comes with unique advantages and challenges, making it important to choose based on your needs and technical expertise.
Option #1: Web Hosting Providers
Web hosting providers are a popular choice, offering pre-configured servers and network, professional technical supports, and user-friendly tools to help you get started. Hosting plans like shared, VPS, dedicated, and cloud hosting cater to a range of needs, from simple blogs to high-traffic websites.
For beginners, shared hosting is affordable and easy to use, while VPS or dedicated hosting offers more control and scalability for experienced users. For better understanding in the differences between web hosting types, check out our detailed guide on web hosting types.


Option #2: Hosting from Home
Hosting your website from home gives you complete control over your server and its configurations.
Instead of relying on a third-party provider, you use your own hardware, such as a spare computer or a dedicated server, to run the site. This approach allows for full customization and flexibility – which can be a great choice for tech-savvy individuals who want to learn about server management or save on recurring hosting fees.
Challenges in Hosting a Website from Home
However, hosting from home comes with its challenges.
You’ll need to install and manage server software like Apache or NGINX, configure DNS settings, and set up port forwarding on your router to make the website accessible online. Additionally, most residential internet service providers impose restrictions on bandwidth usage, which can limit your site’s ability to handle high traffic. Reliability is another concern, as power outages or hardware failures could make your site unavailable.
For personal projects or those who enjoy tinkering with hardware and software, hosting a website on your own computer from home can be rewarding. For others, the time and effort involved may outweigh the benefits.
If you’re interested in hosting a website on your own server, we’ll cover the detailed steps later in this guide.
Option #3: Free Platforms
Free hosting services are appealing for small or temporary projects, but they often come with trade-offs. Popular platforms like WordPress.com, GitHub Pages, and Wix (free tier) provide basic hosting solutions, but they impose restrictions on customization and branding.
For example, WordPress.com is beginner-friendly but limits users on monetization. GitHub Pages is great for developers hosting static websites but doesn’t support dynamic content. Wix’s free tier provides easy drag-and-drop tools but adds platform branding and limits advanced features.
While free hosting is a good way to experiment or build a temporary site, it’s not ideal for professional or growing websites. You may outgrow the limitations quickly, and the lack of control over critical features can hold back your site’s potential.
How Much Does Hosting Cost?
Now that you’re familiar with the hosting options available, the next step is understanding the costs involved. Whether you opt for a professional web hosting provider, host from home, or use a free platform, it’s essential to evaluate both upfront and ongoing expenses.
The costs can vary significantly depending on the method you choose and the features your website requires.
Costs of Using a Web Hosting Provider

Web hosting providers typically charge a predictable monthly or yearly fee based on the type of hosting plan you choose. While their plans vary widely based on the level of service and features, they generally involve recurring costs and optional add-ons.
Below is a detailed breakdown of typical expenses:
Web hosting providers offer a convenient, professionally managed solution with predictable pricing. While their plans vary widely based on the level of service and features, they generally involve recurring costs and optional add-ons. Below is a detailed breakdown of typical expenses:
| Expense | Details | Estimated Cost |
|---|---|---|
| Domain Registration | Your website’s address (e.g., example.com). Essential for any website. | $10–$20/year |
| Shared Hosting | Entry-level hosting; affordable and ideal for beginners. | $3–$20/month |
| VPS Hosting | Provides dedicated resources on a shared server for better performance. | $20–$180/month |
| Dedicated Hosting | A server exclusively for your website; suited for high-traffic sites. | $100+/month |
| Cloud Hosting | Flexible, pay-as-you-go pricing; great for scaling as needed. | $15–$350/month |
| SSL Certificates | Many hosts include basic SSL for free, but advanced certificates cost extra. | Free to $200/year |
| Backup and Security Tools | Optional add-ons for automated backups, malware protection, or DDoS mitigation. | Free to $50/month |
| Email Hosting | Custom email accounts tied to your domain. | Free to $6/month/account |
While shared hosting is the most affordable option for beginners, costs increase with VPS or dedicated hosting as your needs grow. Always factor in optional add-ons, which can enhance your site’s security and performance.
Costs of Hosting from Home
Hosting from home eliminates recurring fees from hosting providers, but it does come with upfront and ongoing expenses. Here’s a breakdown of what you’ll need to consider:
| Expense | Details | Estimated Cost |
|---|---|---|
| Hardware | Use an old computer or purchase dedicated hardware like a Raspberry Pi or a server. | $50–$500+ (one-time) |
| Power Consumption | Servers run 24/7, increasing electricity bills. | $5–$20/month |
| Internet Costs | ISPs may charge for static IPs or higher bandwidth limits; check your plan’s restrictions. | Varies (ISP-specific) |
| Software Licenses | Most server software is free, but you may need paid licenses for advanced configurations. | Free to $100+ |
| Backup Solutions | Consider external drives or cloud storage for backups. | $50–$200 (one-time) |
| Uninterruptible Power Supply (UPS) | Protects against outages and ensures uptime. | $50–$150 (one-time) |
While the hardware investment is a one-time cost, ongoing expenses like power and internet fees add up. For small, personal projects, this approach can still be economical, but for professional websites, the trade-offs in reliability and scalability should be carefully weighed.
The Hidden Costs of Free Platforms
Free hosting platforms may appear cost-free at first glance, but they come with indirect expenses that can impact your site in the long run:
- Domain Costs: Most free platforms don’t include a custom domain, so you’ll likely need to purchase one separately.
- Lack of Monetization: Many free plans restrict your ability to run ads or monetize your site.
- Upgrade Pressure: As your site grows, you may need to pay for premium features like extra storage, bandwidth, or removing ads.
While free platforms are great for experimentation or personal projects, they often come with limitations that can make scaling or professional use difficult without eventual investment.
Essential Tools for Hosting a Website
Whether you’re using a hosting provider or hosting your website from a home server, you need tools to simplify server management, support your website’s functionality, and ensure smooth operations.
We will look at the essential tools you need to host a website below.
Web Hosting Control Panels
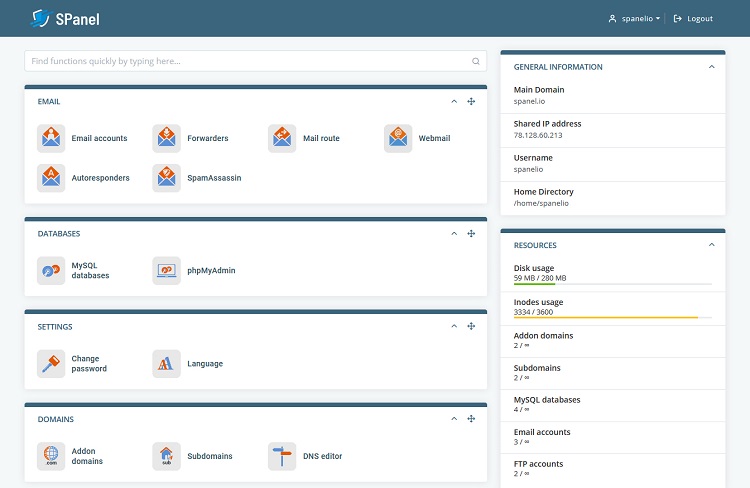
Control panels are software interfaces that allow you to manage your hosting environment without needing to manually configure servers. Using a control panel simplifies complex server tasks, saving time and reducing errors. They are particularly helpful for beginners using hosting providers or those setting up a home server.
Popular Control Panel Options
- cPanel: Widely used and beginner-friendly, offering features like one-click installers, email management, and file organization.
- Plesk: Known for its clean interface, Plesk supports both Linux and Windows servers.
- DirectAdmin: Lightweight and cost-effective, it provides direct hosting management tools without unnecessary extras.
- Spanel: A newer, user-friendly, and much cheaper option that comes with built-in security features.
Content Management Systems (CMS)

A CMS is a platform that enables you to build and manage your website with ease. Pre-designed CMS themes and templates make it easy to create a professional-looking website. CMS plugins and extensions allow you to add features like e-commerce, SEO tools, or analytics. It’s one of the most critical tools for hosting your own website, whether through a provider or a home setup.
Popular CMS Options
- WordPress: Ideal for blogs, portfolios, and small business websites.
- Joomla: More flexible than WordPress but requires slightly more technical knowledge.
- Drupal: Best for large, complex websites with advanced needs.
File Transfer Tools
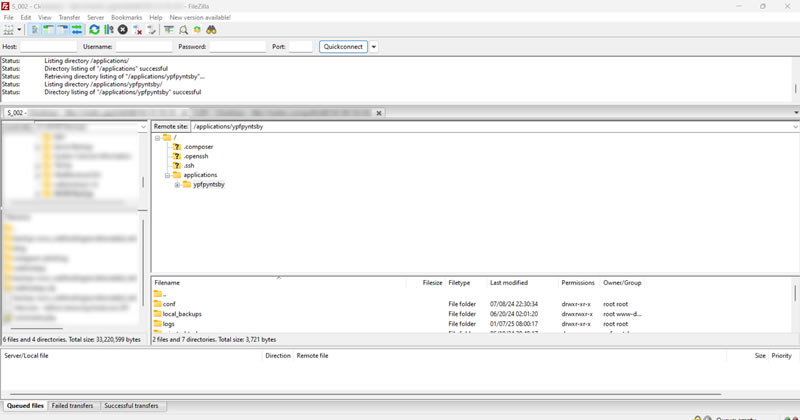
For tasks like uploading website files such as HTML, CSS, and JavaScript files, direct server troubleshooting, or managing server directories, file transfer tools are indispensable. They enable you to connect to your server and move files securely.
Popular Options
- FileZilla: A free, open-source tool for transferring files to and from your server.
- Cyberduck: Offers a user-friendly interface with support for various protocols.
- WinSCP: A Windows-specific file transfer tool with advanced scripting options for automation.
Tools for Home Hosting
If you’re hosting from home, additional tools are required to ensure smooth operations, reliable uptime, and server security. Here’s what you’ll need:
Web Server Software
- Apache: Reliable and widely used for hosting websites.
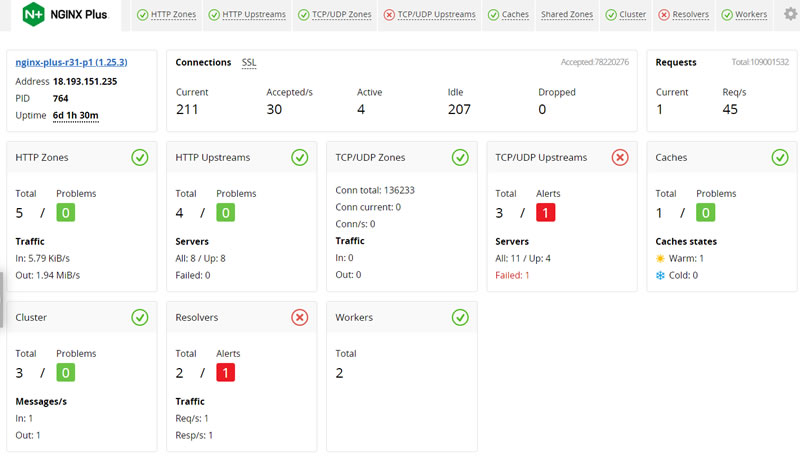
- NGINX: Lightweight and efficient, suitable for high-performance sites.
- XAMPP: A simple package for local development that includes Apache, MySQL, PHP, and Perl.
Dynamic DNS Services
Tools like No-IP or DuckDNS allow you to manage dynamic IP addresses, making it easier to run a website from home.
- No-IP: A free and premium service to map dynamic IP addresses to a consistent domain.
- DuckDNS: A straightforward, free dynamic DNS service for small-scale setups.
Monitoring Tools
- Nagios: A powerful monitoring tool to track server health, uptime, and resource usage.
- Zabbix: A feature-rich alternative for monitoring server performance, with visualization tools.
- Portainer: A GUI tool for managing Docker containers, useful for hosting websites in isolated environments.
Database Management Tools
- phpMyAdmin: A web-based tool for managing MySQL or MariaDB databases.
- Adminer: A lightweight alternative to phpMyAdmin for database management.
Security Tools

Even the best hosting setup can be vulnerable without proper security measures. Here are essential tools to keep your website secure:
- SSL Certificates: Encrypt traffic to and from your website, ensuring user data is protected. Free options like Let’s Encrypt or free SSL management tool like ZeroSSL make implementation straightforward.
- Firewall Tools: Protect your server from unauthorized access. Hosting providers often include these in their packages, but for home hosting, tools like UFW (for Linux) are helpful.
- Backup Solutions: Automate backups with tools like JetBackup (for web hosting providers) or external drives/cloud storage for home setups.
Step-by-Step Guide to Hosting Your Website
Now that you understand the options, costs, and essential tools, it’s time to dive into the process of hosting your own website. This step-by-step guide covers both hosting with a provider and setting up a server at home.
1. Register a Domain Name
A domain name is the first step in establishing your website. It’s your online address and the primary way visitors will find your site.
- Choose a Domain Name: Select a name that reflects your website’s purpose. For example, use .com for businesses, .org for organizations, and .dev or .io for tech-related projects. Keep your domain name short, memorable, and easy to spell.
- Select a Domain Registrar: Popular domain registrars include Namecheap and GoDaddy. Compare pricing, renewal fees, and additional services like domain privacy (which hides your personal details from WHOIS records).
- Search for Availability: Use the registrar’s search tool to check if your desired domain name is available. If not, consider alternatives or different extensions.
- Purchase and Register: Once you’ve chosen a name, register it under your name or business. You’ll typically pay $10 – $20/year. Ensure that your domain name is under your control (not your web developer or agency); enable auto-renewal to avoid accidental expiration.
- Set Up DNS Records: Your domain registrar will provide tools to point your domain to your hosting server. This is done by configuring DNS records (e.g., A, CNAME, or MX records).
2. Select and Set Up Your Hosting Environment
The setup process depends on whether you’re using a hosting provider or hosting from home.
Using a Hosting Provider
- Purchase the Right Hosting Plan: Assess your website’s needs (traffic, storage, scalability) and select shared, VPS, cloud, or dedicated hosting accordingly.
- Set Up the Hosting Account: Log into your provider’s dashboard. Tools like cPanel, Plesk, or Spanel are often included, simplifying tasks like email setup and file management.
- Point Your Domain: Update your domain’s nameservers to the hosting provider’s details (provided in your account). Nameserver changes may take 24–48 hours to propagate globally.
- Install CMS or Server Software: Most hosting providers offer one-click installation for WordPress, Joomla, or server software like LAMP stacks (Linux, Apache, MySQL, PHP).

Hosting from Home
Hosting a website from home offers unparalleled control but involves more technical steps:
- Set Up Hardware: Use a spare computer, Raspberry Pi, or purchase a dedicated server. Ensure the system meets the minimum requirements (e.g., multi-core processor, 4GB+ RAM, SSD storage).
- Install and Configure Web Server Software: Install Apache or NGINX on Linux, or use XAMPP for Windows. Test the server locally by placing a basic index.html file in the web server’s root directory and accessing it via your local IP.
- Set Up Networking: Configure port forwarding on your router for ports 80 (HTTP) and 443 (HTTPS) to your server’s IP. Assign a static IP address to the server to ensure consistent access. For dynamic IPs, use a service like No-IP to map your IP to a domain name.
- Enhance Security: Set up a firewall (e.g., UFW on Linux) and secure the server with SSH keys and disable password-based login.

Build or Upload Your Website
Now that your hosting environment is ready, it’s time to add your website content.
Use a No-code Site Builder or CMS for Simplicity
- Install WordPress, Joomla, or another CMS through your hosting control panel or manually via FTP. Alternatively, some providers offer drag-and-drop site builder on their platform – using such tool can ease up your site creation process.
- Choose a pre-built theme or template and customize it to match your brand.
- Add essential plugins, such as SEO tools, caching plugins, and security add-ons.
Upload Static or Custom Sites
- If your site is built using HTML, CSS, or JavaScript, use an FTP client (like FileZilla) to upload the files to the server’s public_html or equivalent directory.
- Organize files logically and ensure dependencies (e.g., CSS or image files) are properly linked.
Set Up Databases (if required):
- For dynamic websites, create a database (MySQL or MariaDB) using tools like phpMyAdmin.
- Configure your application to connect to the database using secure credentials.
Test and Optimize
Testing your website ensures it’s ready for visitors and performs efficiently.
- Check Loading Speed: Use tools like GTmetrix, Bitcatcha, or Google PageSpeed Insights to identify performance issues. Compress images and minify CSS/JavaScript to improve performance.
- Ensure Mobile Compatibility: Test how your site appears on different devices and screen sizes.
- Fix Errors: Test all forms, interactive elements, and links to ensure they work as expected. Debug any issues using browser developer tools.
- Enable HTTPS: Use Let’s Encrypt to install an SSL certificate and secure your website. Redirect HTTP traffic to HTTPS to ensure secure communication.
Launch and Monitor
With your website ready, it’s time to make it live and keep an eye on its performance.
- Launch the Website: Update DNS settings (if not already done) to make your site accessible online. This change may take up to 48 hours to propagate. Use Whatsmydns.net to check DNS propagation – make sure that the A record is pointing to your current server IP address.
- Set Up Analytics: Install Google Analytics or similar tools to track visitor behavior, traffic sources, and engagement.
- Monitor Performance: Use tools like UptimeRobot or Nagios to monitor server uptime and site performance.
- Perform Regular Backups: Schedule backups to protect your website’s data in case of unexpected issues.
Common Pitfalls to Avoid When Hosting Your Own Websites
There are common mistakes that can lead to unnecessary costs and complications, or worse, derail your entire operation. Below are the key pitfalls to watch out for.
Overspending on Features You Don’t Need
One of the most frequent mistakes is paying for unnecessary add-ons or overestimating your initial requirements. For instance:
- Opting for VPS or dedicated hosting when shared hosting would suffice for a new website or blog.
- Purchasing premium features like advanced SSL certificates or backup solutions when free or basic alternatives are adequate.
Solution
Carefully evaluate your website’s purpose, traffic expectations, and technical expertise before choosing. Start with a basic hosting plan and scale up as your traffic and needs grow.
If your host allows remote database linking, by all means, use it. External databases help lighten the usage of your web disk quota because they store your content outside of your hosting account.
Host all things downloadable on an external file hosting service, such as Photobucket, Vimeo, YouTube, Giphy, and so on.
Make use of our Hosting Cost Calculator to estimate the type of hosting (and cost) you need.
Neglecting Website Security
Security is often overlooked, especially by beginners. This can result in vulnerabilities like data breaches, hacking, or malware infections. Common issues include:
- Not installing SSL certificates, leaving your website user data unencrypted.
- Failing to regularly update software, CMS, or plugins, which creates security gaps.
- Weak passwords or lack of server firewalls.
Solution:
- Always install an SSL certificate (even free options like Let’s Encrypt).
- Keep all software, plugins, and CMS versions updated.
- Use strong, unique passwords and implement two-factor authentication where possible.
Ignoring Performance Optimization and Monitoring
Launching a website is just the beginning. Initial site performance optimization and ongoing maintenance is equally important.
Slow-loading websites can drive visitors away and hurt your search engine rankings. Performance issues often stem from large unoptimized images, excessive use of plugins, lack of site caching, as well as running underpowered hardware for home hosting.
Failing to monitor your server uptime and performance can lead to unnoticed outages. Ignoring plugin or theme updates, as mentioned earlier, can result in vulnerabilities or compatibility issues.
Solution:
- Optimize images using tools like TinyPNG or ImageOptim.
- Enable caching to save server resources and speed up your website. WordPress users can install WP Rocket but if you don’t use WordPress you should try to optimize your website cache with the tools made available by your CMS vendor. For instance, Joomla can count on Cache Cleaner or Jot Cache; while Drupal has several cache performance tools as well.
- Get rid of spam regularly – this include spams in the form of emails, blog comments, pingback URLs and files that overload your servers and database quota.
- Consider using a CDN like Cloudflare for faster content delivery.
- Monitor performance with tools like GTmetrix and address bottlenecks promptly.
- Use monitoring tools like UptimeRobot to track your website’s availability.
- Schedule regular maintenance checks to update software, review logs, and optimize your server’s performance.
Overlooking Backup and Recovery
A common but avoidable mistake is failing to have a reliable backup system in place. Without backups, server failures, hacks, or accidental deletions can result in permanent data loss.
Solution:
- Set up automated daily or weekly backups using your hosting provider’s tools or third-party solutions.
- For home hosting, use external drives or cloud storage like Internxt or Google Drive to secure copies of your website.
Final Thoughts: Start Small, Scale as You Grow
Hosting your own website is an exciting step toward building your online presence. While hosting from home offers complete control and a valuable learning experience, it can be resource-intensive and complex, especially if you are new.
For most readers, starting with a reliable hosting provider is a more practical choice (choose from our best picks here). As your website grows, you’ll benefit from the scalability that hosting providers offer, whether it’s upgrading to VPS, cloud hosting, or adding advanced features like CDN integration or automated malware scanning. These solutions allow you to focus on your website’s content and growth, without the headache in managing server infrastructure and software security patches.
Ultimately, hosting your own website is a journey, not a one-time decision. Starting small with a manageable setup – whether through a provider or home hosting – allows you to scale and adapt as your needs evolve. By choosing the right tools and services, you’ll set your website up for long-term success.