
If you’ve ever tried to run n8n on your own, you probably know how quickly “automation” can turn into manual work. We’ve gone through several setups, including local installs, Cloudways, even premium cloud plans, each came with a learning curve or recurring costs that defeated the purpose of using automation to save time.
Hostinger’s new n8n hosting templates fix that. They include ready-made n8n environments that deploy in minutes, with everything preconfigured. You pick a plan, select an n8n mode, and start building workflows right away.
This guide explains how to self-host n8n on Hostinger’s KVM VPS (Plan 2). You’ll learn how to choose the right template, secure the server, and link a custom domain — all without running manual infrastructure commands.
Save 15% On Hostinger n8n Hosting
If you’re ready to try Hostinger’s n8n-ready VPS, don’t forget to use our promo codes — HOSTSCORE or HOSTSCORE15 — to save 10–15% on your first bill. It’s a quick way to lower your setup cost while getting full access to Hostinger’s VPS features and one-click n8n deployment.
Compare & order Hostinger VPS hosting plans
Why Should You Self-Host n8n Instead of Using n8n Cloud?
Self-hosting n8n gives you full control over automation performance, execution limits, and data storage. You decide how many workflows to run and where your data reside.
n8n Cloud works well for quick tests or low-volume workflows, but costs scale fast once free limits are exceeded. Local setups are cheap but unstable since your PC must stay powered on and public port exposure creates security risks.
A VPS bridges both worlds. Hostinger VPS isolates your environment and allocates dedicated CPU and RAM, keeping workflows online even when your local machine is off. The result is predictable uptime, consistent performance, and full data privacy. If automation is meant to save time, you shouldn’t need to master Docker, SSL, or reverse proxy configuration. That’s why Hostinger’s n8n templates exist. They deploy, secure, and configure everything automatically.

What Do You Need Before Setting Up n8n on Hostinger VPS?
To deploy n8n on Hostinger VPS, prepare the following essentials:
- Hostinger VPS account — You’ll choose your plan and preferred n8n configuration during setup.
- Domain name (optional) — Use it to access your workflows under a clean subdomain
- SSH or browser console access via Hostinger’s hPanel — Used for login, configuration, and quick troubleshooting.
- A few spare minutes — Installation completes in under 10 minutes with Hostinger’s one-click n8n template.
Once these are ready, launch your VPS, select an n8n version, and start building workflows. Hostinger’s VPS deploys, isolates, and monitors your automation environment from the start, ensuring both stability and scalability.
Tip: Compare Hostinger VPS hosting plans (at official site) to find which configuration best supports your n8n workflows and traffic growth. Each plan includes SSD storage, dedicated resources, and full root access for maximum flexibility.
How Do You Deploy n8n Using Hostinger’s Prebuilt VPS Template?
Hostinger’s VPS setup wizard walks you through the whole process with no CLI work required. The screenshots below show exactly what you’ll see from start to finish.
Step 1: Start VPS Setup
Once you’ve purchased a plan, log in to your Hostinger account and go to hPanel › VPS. If your VPS isn’t set up yet, you’ll see a message at the top of the dashboard: “Your KVM 2 – setup isn’t finished yet”.
Click Set Up to begin.

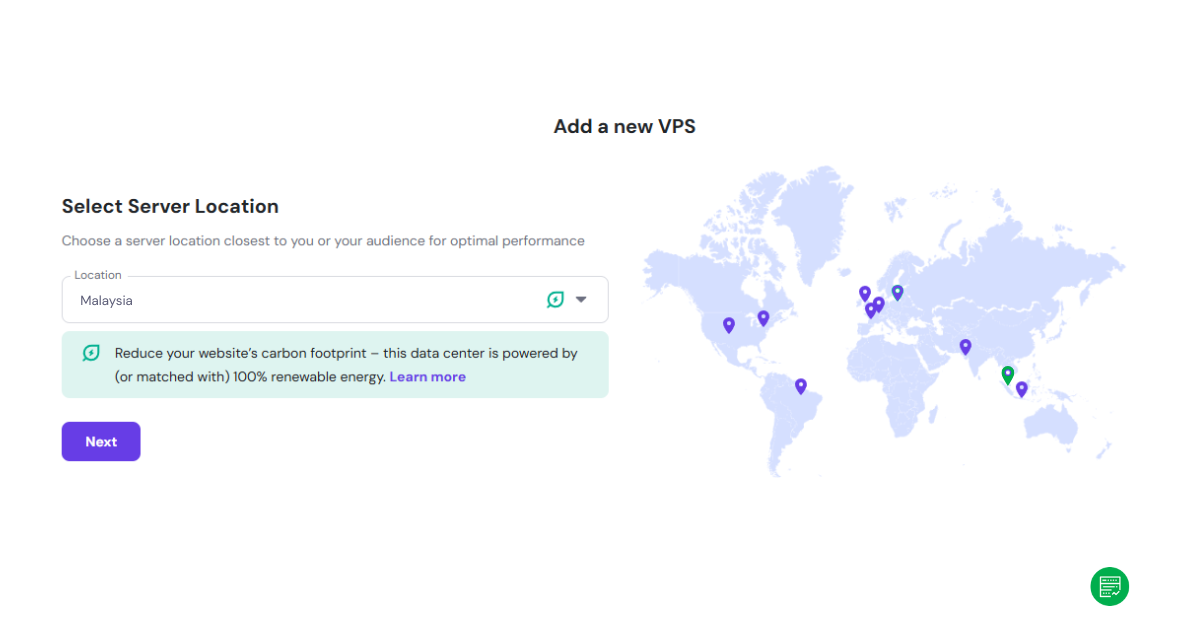
Step 2: Choose Your Server Location
Pick a data-center region near you or your users. This helps reduce latency and improves API response times for connected services. Hostinger highlights each data-center on a world map. I went with Malaysia because it’s where I am located at and powered by renewable energy.
Step 3: Select the Operating System Type
Now, you’ll be asked to choose what kind of environment to install. Hostinger divides options into three categories:
- Plain OS: a bare Linux installation with no additional software.
- OS with Panel: typically cPanel, Plesk, or CyberPanel for hosting websites.
- Application: preconfigured apps that are ready to use right away.
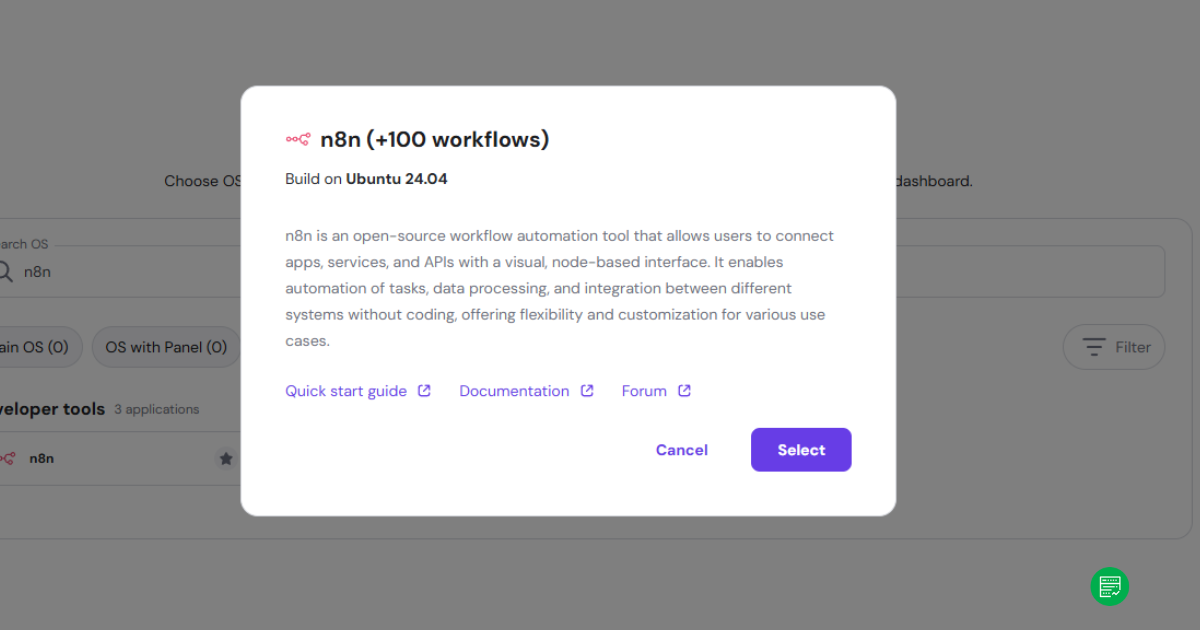
For n8n, click on the Application tab. Choosing “Application” tells Hostinger you want an automated installation, not a blank Linux system. The server will then deploy with Ubuntu 24.04 and all necessary dependencies (Node.js, npm, database connectors) already set up for n8n.
This saves at least 30–45 minutes of manual work and prevents version mismatches between packages.

Step 4: Pick the n8n Template
Once you’re in the Application section, type n8n in the search bar. You’ll see three official templates listed under Developer Tools: n8n (standard), n8n (+100 Workflows), and n8n (Queue Mode).
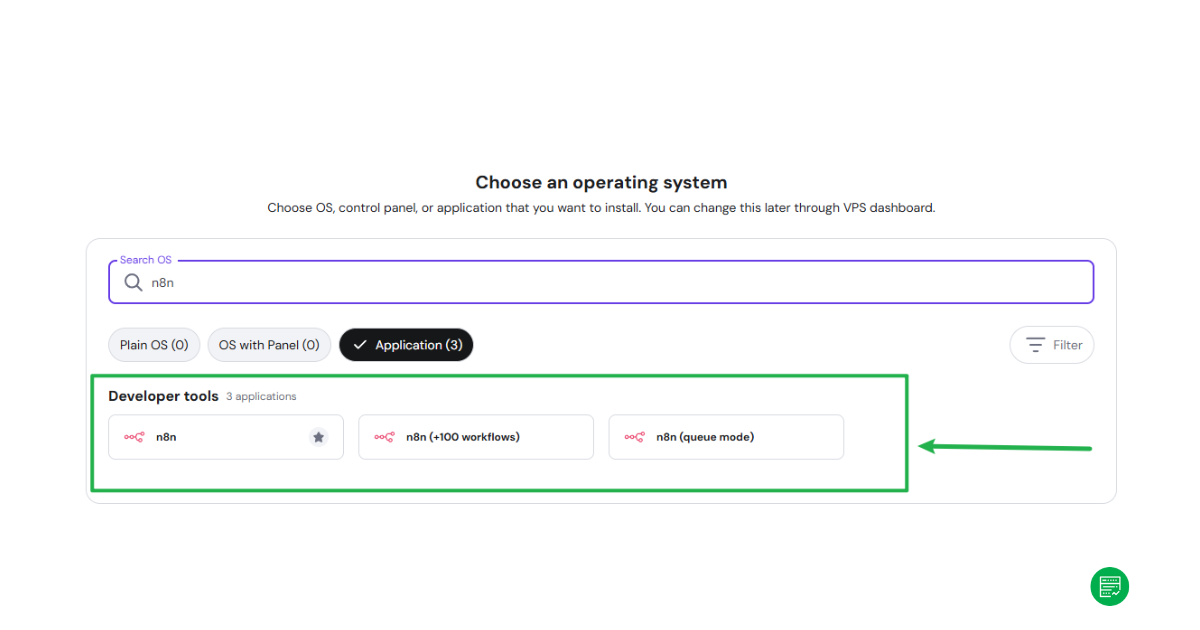
Each template installs n8n with all dependencies preloaded and mapped to port 5678. The key differences and use cases for these three n8n templates are listed in table below.
| Template | Description | Best For |
|---|---|---|
| n8n (Standard) | Basic setup of n8n on Ubuntu 24.04. Ideal for testing or personal use with limited workflows. | Beginners, lightweight automation |
| n8n (+100 Workflows) | Optimized version with higher workflow concurrency limits and more background processing power. | Small businesses or power users |
| n8n (Queue Mode) | Includes Redis for parallel job execution and queue management. Offers the best scalability but requires advanced setup knowledge. | Teams or production-grade automatio |
Before selecting, consider how you plan to use n8n:
- If you’re experimenting or running simple automations (like email parsing or Google Sheets syncs), go with the Standard option.
- If you run more than 50–100 workflows or rely on multiple integrations (Slack, Airtable, HubSpot, etc.), choose +100 Workflows.
- If you process many webhooks simultaneously or build multi-user environments, Queue Mode is worth it (though you’ll need some Redis familiarity).
Note that once your n8n template is installed, you can’t switch between these modes directly from hPanel.
If you need to change configurations later, you must:
- Remove the current n8n installation.
- Reinstall the VPS with your preferred image.
- Re-import your saved workflows manually.
Step 5: Set VPS Password and SSH Key
Next, create your root password and, optionally, add an SSH key for password-less login. You’ll create a root password for administrative access and, optionally, add an SSH key for passwordless login.
For best security practice, always use at least 12 characters with upper/lowercase, numbers, and symbols. Add an SSH key if you’re comfortable using terminal access — it makes reconnecting faster and avoids password exposure.

Step 6: Enable the Free Malware Scanner
Hostinger includes a built-in Malware Scanner at no extra cost. It automatically checks your VPS for infected scripts, malware uploads, or unusual system behavior.
Keep this option enabled. You can disable or re-enable it later from your VPS dashboard, but it’s a good default layer of protection.

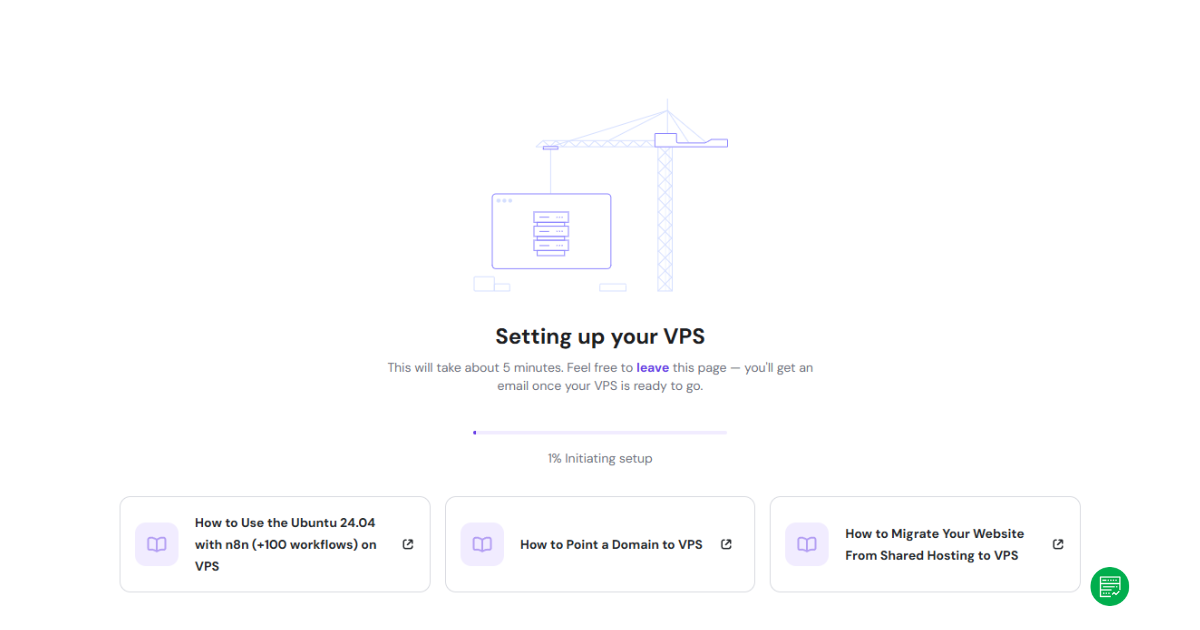
Step 7: Wait for Deployment
Click Finish Setup and Hostinger begins provisioning your VPS.
The process usually takes about five minutes. You can leave the page; you’ll receive an email once the server is ready.
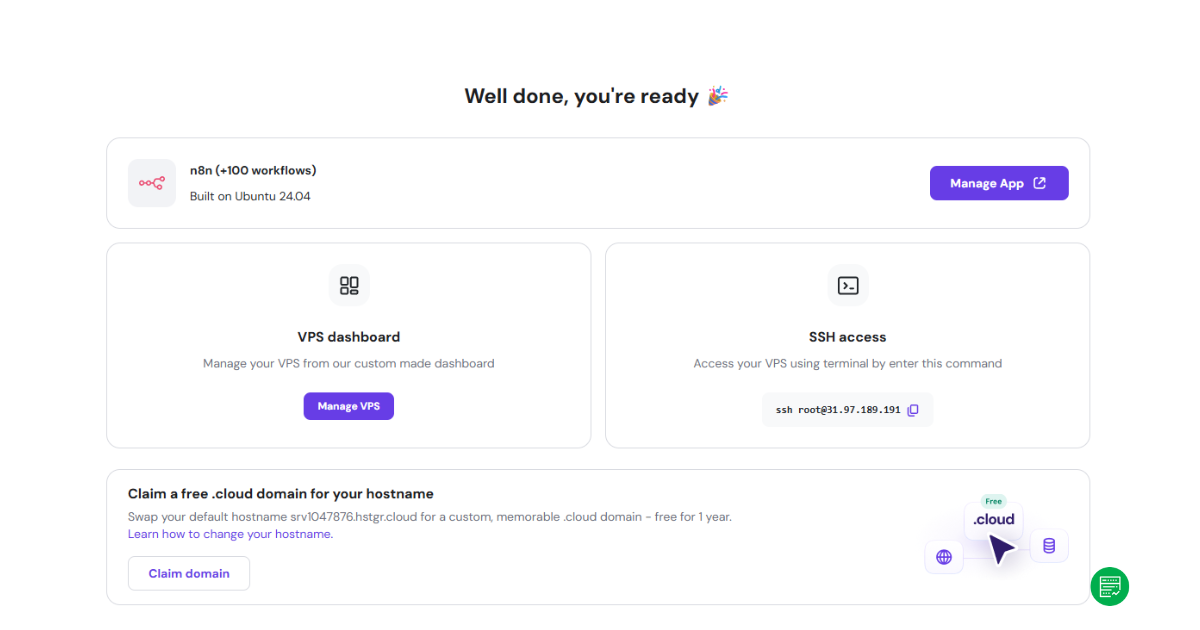
Step 8: Access Your VPS and n8n App
When setup completes, you’ll see a confirmation screen showing your VPS Dashboard and SSH Access details. You can manage the app directly from Manage App or connect via terminal using the SSH command shown.
Hostinger also lets you claim a free .cloud subdomain for quick access.

Step 9: Confirm Everything in hPanel
Finally, open your VPS overview to verify that:
- n8n (+100 workflows) is listed under Applications,
- Your VPS status shows Running, and
- The malware scanner is marked Active.
This confirms that your self-hosted n8n environment is live.

How Can You Secure and Manage Your Self-Hosted n8n?
Hostinger provides integrated security and management layers through hPanel, including malware protection, firewall control, SSL encryption, DNS mapping, and automated backups. These systems secure and isolate your n8n VPS, ensuring stable performance and recoverability.
With full administrative control and predictable uptime, your self-hosted n8n environment becomes truly production-ready, free from third-party resource limits.
Malware Protection
The malware scanner is enabled by default when you set up your server. It automatically monitors and scans for suspicious scripts or injected code, helping detect threats early. You can review or re-enable it anytime in the VPS dashboard. Combined with Hostinger’s VPS isolation, which separates your instance from other users on the same hardware, this provides a solid baseline for security.
Firewall Rules
Next, it’s important to secure your network access. A simple firewall configuration goes a long way. Hostinger’s VPS panel allows you to restrict open ports, and for n8n, you typically only need two: port 22 for SSH and port 5678 for the n8n dashboard. Closing everything else minimizes exposure to unauthorized access.
SSL Encryption
Since Hostinger automatically installs an SSL certificate during deployment, your n8n dashboard is secured by default. You can access it directly via sub domain address (https://n8n.xxx.hstgr.cloud/) or your connected domain without needing manual configuration. The certificate is provisioned through Hostinger’s system and renews automatically, so you don’t need to run Certbot or configure Cloudflare unless you prefer custom DNS routing.
This setup means your workflows, webhooks, and API calls are encrypted out of the box. Users get HTTPS security from the first login. It’s a small but meaningful convenience that saves time and removes one of the more technical steps usually required when self-hosting automation tools.
DNS Manager
If you plan to access your n8n dashboard via a domain, Hostinger’s DNS Manager makes it straightforward. You can add an A record that points your domain or subdomain (for example, automation.yourdomain.com) to your VPS IP. This gives you a clean, permanent URL for all workflow triggers. A fixed domain is especially useful for webhooks and API callbacks.
Backup and Restoration
Hostinger’s backup system is another key feature to rely on. Weekly backups are included free, and you can upgrade to daily backups for $6/month if you need tighter recovery intervals. These backups store and restore full server snapshots, meaning you can roll back your n8n environment anytime without losing data. Inside n8n, you can also export workflows as JSON files for extra redundancy.
Hostinger API
Beyond these essentials, developers can use the Hostinger API to manage servers programmatically. The API lets you automate tasks like restarting your VPS, creating snapshots, or updating DNS records — a nice bonus if you want to integrate hosting control into your own workflow scripts.
How Much Does Self-Hosting Cost?
Self-hosting n8n on Hostinger is inexpensive compared to running it on managed cloud accounts. You’re paying only for the VPS itself. There are no execution limits, workflow caps, or per-node pricing in Hostinger n8n hosting packages.
Hostinger’s VPS plans start from $4.99/month, but the sweet spot for most automation setups is KVM 2 (the plan I am currently using for my own project). It includes 2 vCPUs, 8GB RAM, 100GB of NVMe storage, and 8TB bandwidth — more than enough for hundreds of daily workflows.
| Plan | vCPU | RAM | Storage | Bandwidth | Price (mo) | Renewal |
|---|---|---|---|---|---|---|
| KVM 1 | 1 | 4 GB | 50 GB NVMe | 4 TB | $4.99 | $9.99 |
| KVM 2 | 2 | 8 GB | 100 GB NVMe | 8 TB | $6.99 | $12.99 |
| KVM 4 | 4 | 16 GB | 200 GB NVMe | 16 TB | $9.99 | $24.99 |
| KVM 8 | 8 | 32 GB | 400 GB NVMe | 32 TB | $19.99 | $49.99 |
Each plan includes weekly backups and free SSL by default. Daily backups can be added for $6/month, which is still significantly cheaper than scaling costs on n8n Cloud or other managed platforms.
In practical terms, a self-hosted setup costs under $7/month for full control and unrestricted automation, roughly one-third of what you’d pay for a similar capacity plan on n8n Cloud.
Pros and Cons of Using Hostinger for n8n
| Pros | Cons |
|---|---|
| One-click deployment with prebuilt n8n templates | You can’t switch between n8n configurations after installation |
| SSL installed automatically | Advanced queue setup requires Redis familiarity |
| Weekly backups included; daily optional for $6/month | No auto-scaling beyond VPS resources |
| Free malware scanner included | Manual maintenance still needed for updates |
| Affordable, predictable pricing | Some latency variance depending on data center |
Hostinger simplifies self-hosting by removing the technical barriers to deployment. Its n8n templates automatically install dependencies, configure SSL encryption, and provision server resources, allowing users to focus fully on building workflows. Advanced configurations such as queue mode or multi-node scaling still require manual setup; however, for individual users or small teams, these limits rarely impact daily automation workloads.
Final Thoughts
Save 15% On Hostinger n8n Hosting
If you’re ready to try Hostinger’s n8n-ready VPS, don’t forget to use our promo codes — HOSTSCORE or HOSTSCORE15 — to save 10–15% on your first bill. It’s a quick way to lower your setup cost while getting full access to Hostinger’s VPS features and one-click n8n deployment.
Compare & order Hostinger VPS hosting plans
Running n8n on a VPS once required manual Docker setup, SSL configuration, and multiple restarts before reaching the dashboard. Hostinger’s prebuilt templates remove that friction — you deploy once, log in, and start automating immediately.
In practice, the setup balances performance and cost effectively. It’s fast enough for production workloads yet affordable for personal automation projects. With built-in SSL encryption, automated weekly backups, and active malware scanning, Hostinger delivers real-world reliability without maintenance complexity.
For users serious about workflow automation but unwilling to manage cloud infrastructure manually, Hostinger’s n8n VPS offers one of the most accessible and cost-efficient self-hosted solutions available.
To learn more about its performance, server uptime, and hPanel features, check out our detailed Hostinger VPS review.